Imagine stepping into a shower that feels like a private spa, right in your Anderson home. No more cold tiles or cramped corners—just a sleek, water‑kissed oasis you’ll actually look forward to using.
Homeowners across the Upstate are swapping outdated tubs for walk‑in showers that boost resale value and make morning routines a breeze. The secret isn’t a pricey remodel; it’s knowing which fixtures, layouts, and local codes make the biggest impact.
Most DIY attempts flop because they skip the planning stage or choose the wrong shower pan for our humid climate. You’ll avoid those costly missteps by learning the exact questions to ask before any demolition begins.
Ready to see the exact steps that turn a cramped tub into a show‑stopping shower? Keep reading and we’ll walk you through every decision, from tile choice to final trim.
Assessing Your Space: Measurements, Layout Options, and Local Building Codes
Take Accurate Measurements
Grab a steel tape, a notebook, and note the length, width, and ceiling height of the room—no shortcuts.
Measure twice, record once, then double‑check the distance between existing plumbing, doors, and windows.
- Floor footprint: include any built‑in cabinets or radiators.
- Clearance zones: at least 30″ in front of the shower entrance.
- Rough‑in locations: where the water lines and drain will sit.
Explore Layout Options
With the numbers in hand, sketch three simple layouts: straight‑run, corner, and curbless walk‑in.
Each layout has a sweet spot—straight‑run for tight spaces, corner for maximizing square footage, curbless for a spa‑like feel.
- Consider traffic flow: keep the door swing clear of the shower head.
- Think about future accessibility: a bench or low curb can be added later.
- Plan for storage: niches or recessed shelves fit best in corner designs.
Know the Local Building Codes
Anderson’s code book isn’t a suggestion; it’s the rulebook that protects you from costly re‑work.
Key points to verify: minimum shower pan slope (¼‑inch per foot), required waterproofing membrane, and vent requirements for humidity control.
- Check the city’s permit portal for the latest shower enclosure regulations.
- Confirm that the drain size matches the pan material—often 2‑inch for acrylic, 3‑inch for tile.
- Make sure any new electrical fixtures meet the wet‑location standards.
Choosing the Ideal Shower Base: Materials, Drain Types, and Moisture Management for Anderson’s Climate
Before you even pick a tile, the base is the foundation of every great shower. In the Upstate, humidity and occasional rainstorms demand a pan that won’t swell, crack, or leak. Pick the right one, and you’ll thank yourself every morning.
Material Options
Each material has a personality. Choose the one that matches your budget and durability needs.
- Cast iron – heavy, solid, and virtually indestructible. Works great with vintage homes.
- Acrylic – lightweight, easy to install, and forgiving on minor shifts.
- Fiberglass – budget‑friendly, but watch for scratches over time.
- Tile‑over‑membrane – gives you endless design freedom, but requires a perfect waterproof layer.
When you’re in Anderson, think about the local temperature swings. Cast iron holds heat, so your shower stays warm longer. Acrylic cools quickly, which can be a plus in summer.
Drain Types
The drain is the unsung hero. A bad drain equals standing water, mold, and headaches.
- Linear (trench) drain – sleek look, perfect for barrier‑free designs.
- Center floor drain – classic, easy to clean, works with most pans.
- Wall‑sill drain – saves floor space, ideal for small bathrooms.
Pick a drain that matches your pan’s slope. A 1/4‑inch per foot slope is the sweet spot for quick water evacuation.
Moisture Management
Anderson’s humidity can turn a great shower into a swamp if you ignore moisture control.
- Use a closed‑cell foam backer board under the pan to block vapor.
- Seal every joint with a high‑quality silicone that resists mildew.
- Install a vent fan rated for at least 1 CFM per square foot of bathroom.
Don’t skimp on the fan. A good exhaust keeps the grout from turning black and the air fresh for the whole house.
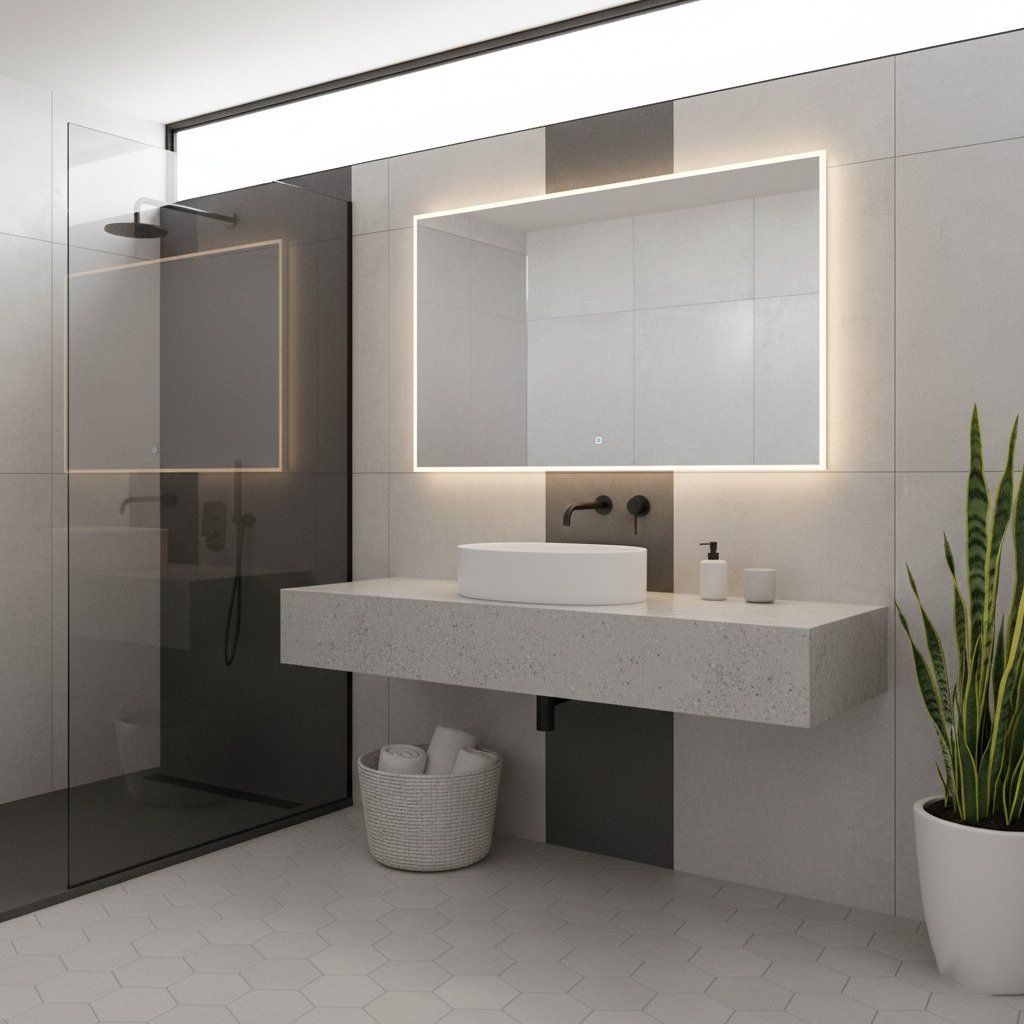
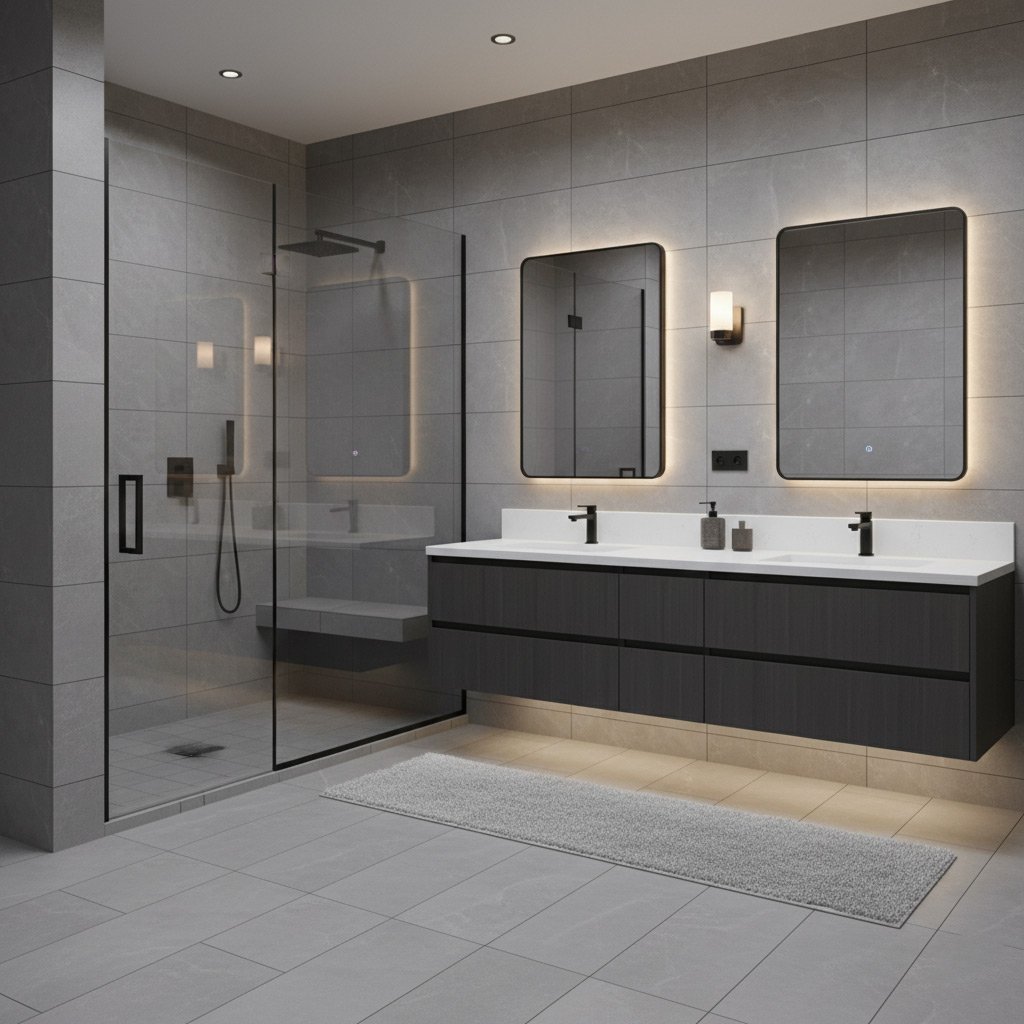
Selecting Fixtures and Finishes: Tiles, Glass Enclosures, Showerheads, and Hardware
Tile Choices That Hold Up in Anderson
When the humidity rolls in, you need a surface that won’t turn into a slip‑n‑slide. Porcelain and natural stone are the go‑to because they absorb less water and stay cool underfoot. Look for a PEI rating of 4 or higher if you want a tile that can take daily traffic without chipping.
- Porcelain – low porosity, easy to seal
- Slate or travertine – rustic look, needs a good sealant
- Ceramic mosaic – great for accent walls, but watch grout lines
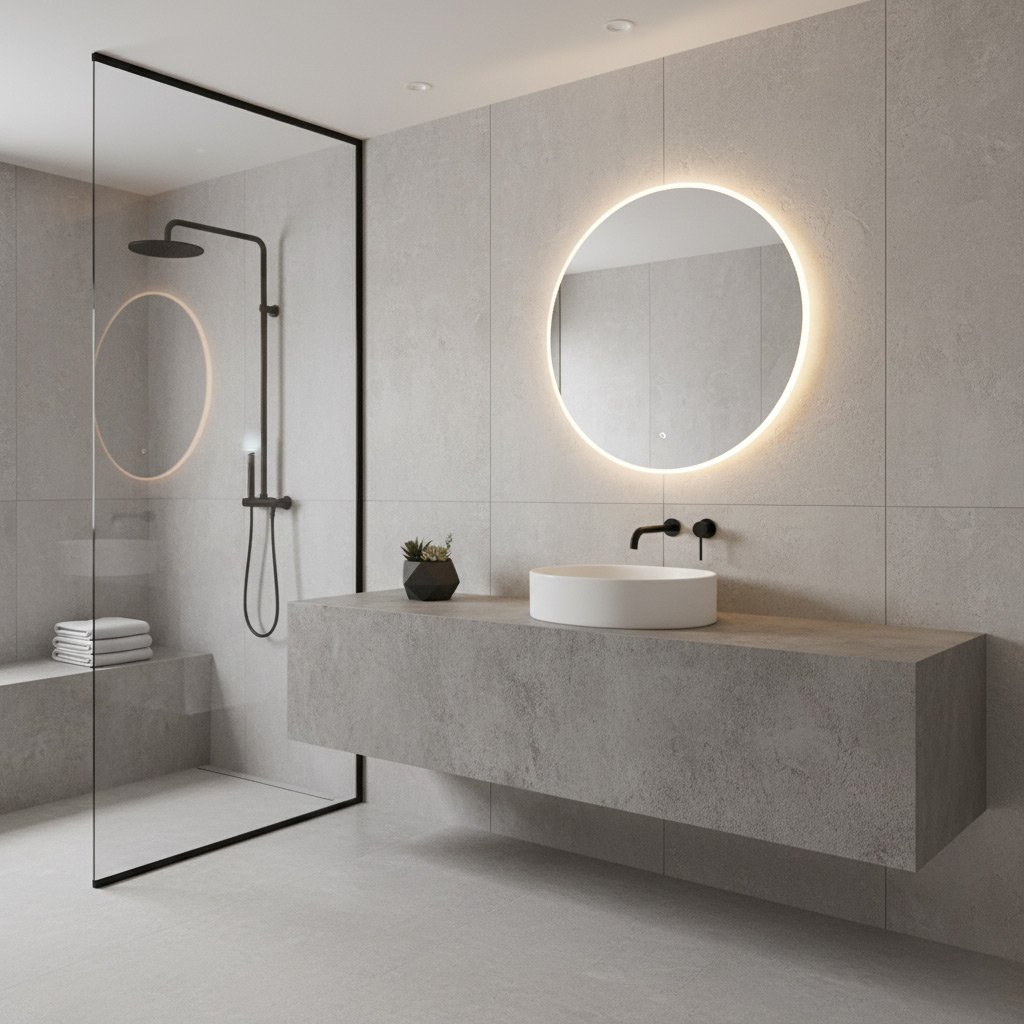
Glass Enclosures: Style Meets Function
A clear wall can make a tiny shower feel like a spa. Frameless glass gives a modern vibe, while a slim aluminum frame adds a touch of industrial grit. Tempered glass (at least ¼‑inch thick) is a must in South Carolina; it won’t shatter if a tile cracks.
- Frameless – sleek, easier to clean
- Framed – budget‑friendly, adds structural support
- Sliding vs. hinged – sliding saves space in tight bathrooms
Showerheads and Hardware: Small Details, Big Impact
Don’t underestimate the power of a good showerhead. A rain‑style head delivers a gentle cascade, while a handheld sprayer tackles hard‑to‑reach spots. Choose finishes that match your hardware – brushed nickel, oil‑rubbed bronze, or matte black – and make sure every valve is certified for low‑flow to keep water bills in check.
- Rain head – luxury feel, high flow
- Handheld – flexibility, ideal for kids
- Eco‑mode – saves water without sacrificing pressure
Designing for Comfort and Accessibility: Benches, Niches, Lighting, and Safety Features
Benches & Niches
Adding a built‑in bench turns a plain shower into a place you actually want to linger. Choose a slip‑resistant surface like textured stone or a matte tile to keep feet steady.
Recessed niches keep shampoo and soap off the floor and within arm’s reach. Place them at eye level so you don’t have to stretch or crouch.
Lighting the Shower
Good lighting does more than brighten the space; it sets the mood. Install a waterproof LED strip along the ceiling or behind the glass for a soft glow.
Layer your lighting: a recessed ceiling light for overall illumination, plus a dimmable accent light over the bench for reading or relaxing. Make sure every fixture has an IP rating of 70 or higher to survive the steam.
Safety First
Slip‑resistant flooring is non‑negotiable. Porcelain tiles with a matte finish or a pebble‑stone shower floor give traction without sacrificing style.
Grab bars can be sleek and discreet. Opt for stainless steel bars that blend with the hardware, and position them near the entrance and inside the bench area.
Don’t forget a low‑threshold entry. A curbless design eliminates tripping hazards and makes the shower accessible for everyone, from kids to seniors.
Budgeting and Timeline: Cost Breakdown, Permits, and Working with Licensed Anderson Contractors
Cost Breakdown
Know exactly where the money disappears. A walk‑in shower in Anderson typically lands between $8,000 and $15,000, depending on the choices you make.
- Base pan & waterproofing: $1,200‑$2,500
- Tile (floor & walls): $2,000‑$5,000
- Glass enclosure: $1,000‑$3,000
- Plumbing fixtures (showerhead, valves): $800‑$2,200
- Labor & contractor markup: 30‑45% of total
Permits & Inspections
South Carolina law isn’t a suggestion—if you touch plumbing or structural elements, you need a permit. Ignoring it can mean a costly stop‑work order.
- Apply at Anderson’s Building Department (usually $100‑$250)
- Plan review takes 5‑10 business days
- Final inspection required before you can use the shower
- Keep copies of all approvals; they protect you when you sell
Choosing the Right Contractor
Don’t chase the cheapest quote; chase a licensed pro with local references. A reputable Anderson contractor will keep the project on schedule and protect you from surprise costs.
- Verify South Carolina contractor’s license (SC DHEC)
- Ask for at least three recent bathroom remodel references
- Get a detailed, written estimate that breaks down labor, materials, and permits
- Insist on a clear timeline with milestones (demo, waterproofing, tile, finish)
- Make sure they carry workers’ comp and liability insurance
Case Study: Transforming a 1970s Tub into a Spa‑Like Walk‑In Shower in a Historic Anderson Home
The Starting Point
When the owners opened the bathroom door, they were greeted by a cracked, pink enamel tub that had seen better decades. The original layout left only a half‑square foot of usable floor space, and the plaster walls were prone to moisture stains.
Key challenges:
- Preserve the home’s historic character while modernizing the wet area.
- Work around a low‑slope concrete slab that didn’t meet today’s drainage standards.
- Stay within the city’s preservation guidelines and avoid costly permit delays.
The Design Decisions
We swapped the tub for a linear, acrylic shower base that sits flush with the existing slab, eliminating the need for a full demolition. A frameless glass enclosure was chosen to keep sightlines open and honor the period’s clean lines.
Materials and fixtures selected:
- Tile: 12‑inch matte porcelain in a soft dove gray, mimicking the original plaster texture.
- Showerhead: Rain‑type, low‑flow model that delivers a spa feel without spiking the water bill.
- Hardware: Brushed nickel brackets and a recessed niche for shampoo bottles.
The Result
After a six‑week schedule, the bathroom now boasts a walk‑in shower that feels like a private retreat. The new base drains quickly, the glass walls stay clear, and the owners report a 30% increase in home value according to their latest appraisal.
Most importantly, the remodel respects the house’s 1970s roots while delivering a modern comfort level that makes every morning feel like a mini‑vacation.
Final Words
Now that you’ve got the playbook, the real work begins when you pick up the phone and lock in a licensed Anderson contractor. Don’t wait for the perfect moment—start with a quick site visit and let the pros confirm your measurements.
Quick‑Start Checklist
- Schedule a free design consultation with a local shower specialist.
- Verify that your chosen shower base meets Anderson’s humidity requirements and local code.
- Gather product samples (tile, glass, hardware) and bring them to the meeting.
- Ask for a detailed, itemized quote that includes permits and disposal fees.
- Set a realistic timeline—most walk‑in showers wrap up in 4‑6 weeks.
When you’re ready to explore more options, check out our New Showers page for the latest trends and proven installers. A solid plan today means a spa‑like shower tomorrow—no guesswork, just results.
People Also Ask
What are the key measurements I need before remodeling my bathroom in Anderson, SC?
Measure the overall room dimensions, ceiling height, and the distance between existing plumbing fixtures. Also note the width and length of the shower area to ensure proper tile layout and enclosure fit.Which shower base material works best for Anderson’s humid climate?
A waterproof acrylic or stone‑capped concrete base provides excellent moisture resistance and durability in the humid South Carolina climate. Both options also offer easy maintenance and a sleek appearance.Do I need a permit for a new walk‑in shower in Anderson?
Yes, most structural changes, plumbing re‑routing, and electrical work require a building permit from the City of Anderson. Hiring a licensed local contractor will help you navigate the permit process smoothly.How can I make my new shower more accessible for seniors?
Incorporate a low‑threshold or curbless entry, built‑in bench, and grab bars. Adding non‑slip tile and adequate lighting further enhances safety and comfort.What is a realistic budget and timeline for converting a 1970s tub into a walk‑in shower?
Expect a cost range of $8,000‑$15,000 depending on materials and finishes, with a typical timeline of 2‑4 weeks. Planning for permits and potential unforeseen issues can help keep the project on schedule.Anderson Bathroom Remodel brings over 15 years of residential remodeling expertise to homeowners throughout Anderson, South Carolina. Their team combines skilled craftsmanship with a deep understanding of local design trends to deliver functional, stylish bathroom transformations. Committed to personalized service, they work closely with each client to ensure projects reflect the unique character of the community.
Need Bathroom Remodel?
We transform bathrooms in Anderson, SC and surrounding ZIPs (29621, 29624, 29634, 29678, 29640), delivering high‑quality remodels completed on schedule. Expect a refreshed space ready for everyday use without delay.
Get Bathroom Estimate